|
AirC – Scissor(s), Replace
s C 3D inside scissor (both hgts)
S C 4A outside scissor (both hgts)
M 620A 7/8″ C P O shaft (2) H 3923 S lic P in (1)
H 4256 W ire ties, 8 inch (6)
H 3143 E -clips (6)
H 1000 sheet m etal screw , #8 x 3/4 hex hd w asher (4)
IMPORTANT:
- Have tape available so that you can use it to identify components that are removed or disconnected for quick reference when you reattach them.
- Take many photos for reference.
|
- Elevate the table
- Unplug the table
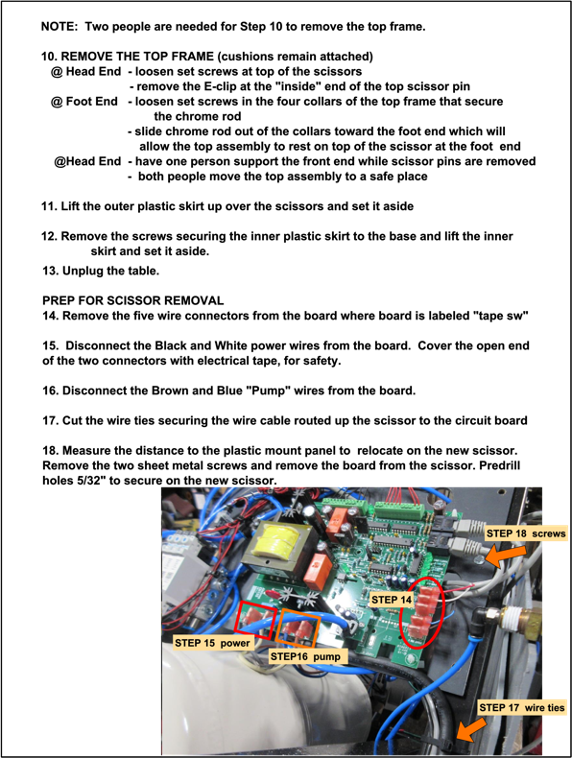
- Remove 4 screws securing the front panel of the control box.
- Inside the control box, disconnect the hose from the gauge and disconnect the ethernet cord from the green circuit boad.
- Remove tension from all drop locations except cervical and continue unthreading each knob until removed from the table.
- Rem ove the screws securing the plastic cover panels extending down from each side of the thoracic cushion and set panels aside.
- Remove screws securing outer skirt to the top frame and lower the skirt to rest on the base.
- Disconnect air hoses from each air cylinder, cervical, thoracic, thoracic breakaway, lumbar, and pelvic. Label each hose for reattachment.
- Disconnect the hose from each side of the air filter which is located on the scissor. Label each hose for reattachment.
|