How Can We Help?
Search for answers or browse our help center.
-
General Questions
- 220V Input 110V Output Toroidal Transformer
- Add a Crescent Head
- Add a Stop to a Mechlok
- Add a Threaded Insert in a Cushion
- Add Arm Board
- Add Brace for Lumbar Cushion
- Add Chin Strap to Cervical Device
- Add Double Touch Function to a Table with a Board
- Add Foot Cushion
- Add or Replace a Corded Pedal
- Add Stirrup to Cushion with a Flat Bottom
- Add Stirrups to Counterstrain Table
- Add Tape Switches to 115V
- Adding a Mechlok Release to a Cushion
- Adding a Raised Head Option
- Adding Pelvic Drop (Bolt-on)
- Adjustable Arm Rest, Low Profile
- Align Rocker Foot Pedal
- Can I add a drop to my chiropractic table?
- Check Connections
- Connecting New 4-Pedal Assembly to 4- Motor Table (Before 2008)
- Convert Drop Foot to Adjustable Foot
- Convert to Adjustable Armrest
- Curtain Bracket
- Curve Restorer
- Distraction - Flow Control Valve
- Find a product manual
- Flame retardant documentation
- Flow Control Valve
- Fold-down Arm Rests
- Help! My table is broken, how do I know what part I need to fix it?
- How do I find my serial number?
- How do I get pricing or place an order for parts?
- How to Add Double Touch Function to a Table with a Board
- How to Convert Drop Foot to PT Foot
- How to Mount the Outside Skirt
- How to Replace the Linear Bearing for the Drop
- Is there a preventative maintenance schedule for my table or chair?
- Kit Prep - Tape Switches to 115V
- Marsh Bello Fram Regulator
- Mechlok and/or Cable
- Mechlok and/or Cable Remove or Release
- Motor Terminal Block
- Mount Side Rails
- Mounting
- One-Piece Cushion Assembly
- Paper Cutter
- Pelvic Crossbar - Maintain Tension
- Plug In Side Supports
- Plug-in Side Supports
- Prep for KIT11-063
- Reed Switch Mounting
- Reinforce Motor Mount - Trendelenburg Table
- Reinforce the Cushion
- Remove Covers and Lower Outer Skirt - Trendelenberg Tables
- Repair Cervical Mechlok Mount
- Repair Main Release Mechlok Mount
- Repair Skirt Mount Angle
- Replace a Micro Switch
- Replace a T-Nut
- Replace a Taper Pin in a Lifter Handle
- Replace Bushings
- Replace Fold Down Arm Rest
- Replace Gash Shock
- Replace Kelly brand Air Regulator
- Replace Neck Pad Encasement on Cervical Device
- Replace Oilite Bushing
- Replace Pelvic Cushion
- Replace Pelvic Pancake Cylinder
- Replace Tension Handles
- Replace the Dog Pawl Spring
- Replace Upper Frame and Cushion
- Replacing a Push Button Switch
- Replacing the Load Cell
- Restraint Belt
- Rocker Pedal - Add to, or Replace a Corded Pedal
- Side Rails, Mounting
- Standard MD with Stirrups Add Stops
- Stool Base - Wheels
- Stool Base Wheels
- Temporary By Pass of Air Regulator
- Temporary By-pass of Air Regulator (Tables thru 2011)
- Trendelburg with Stirrups Add Stops
- Trendelen Tables - How to Access the Enclosure
- Untitled
- What are the dimensions of my table or chair?
- What is the weight capacity of my table or chair?
- What model do I have?
- Show all articles (73) Collapse Articles
Print
Replacing a Push Button Switch
Replacing a Push Button Switch
- Take note of each w ire and its term inal before disconnecting the w ires to the sw itch you are replacing.
- The fastest w ay to rem ove the original sw itch from the panel is to cut off two of the “wings” that retain the switch in the panel cutout OR squeeze the wings against the switch body and push it out from the back side of the panel.
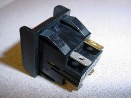
3. Take note of the “A” and “B” on the back of the sw itch and orient the new sw itch the sam e as the others before pressing the sw itch into the cutout from the front side of the panel.