Search for answers or browse our help center.
Add Rotation
Air Flex Table – Adding Rotation
Parts:
Hill Labs personnel refer to the Internal Parts Database in Filemaker for Assembly of the kit.
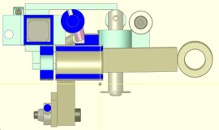
1. Install the mechlok with a shoulder bolt at each end as shown. Include a washer on the bolt that secures the upper end to the cross bar. Secure each with a unlock nut. 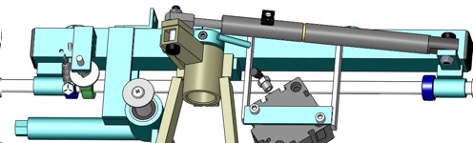
2. Thread a nut onto the elevator bolt and then thread the elevator bolt into the tab on the crossbar. 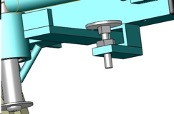
3. Install the handle assembly into the cross bar in the following sequence. Insert the rod with handle into the first bushing of the cross bar weldment, add a plated collar (A), the centering pin (B), the cam (C), and a second plated collar (D) before inserting the rod through the second bushing of the cross bar weldment.
A B C D
Note: The offset orientation of the centering pin as you place it on the rod.
3. (Continued) After the handle and parts are fully inserted in the crossbar weldment orient the handle straight down to the floor with the outside face of the handle a distance of 1 1/2 inches from the bushing on the weldment. Slide the plated collar against the inside face of the bushing and secure the collar with the set screws.
1 1/2 in
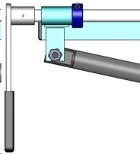
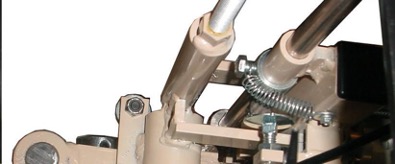
4. At the other end of the crossbar secure the other plated collar against the inside face of the bushing using the 1/2″ long hex bolt at the 9 o’clock orientation (shown below). insert the bolt through the extension spring before threading into the collar. The set screw is oriented up so that it can be accessed for tightening.
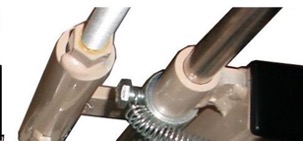
5. Attach the other end of the spring to the bottom surface of the cross bar with the small washer and the 3/4″ long screw. There is a predrilled hole on the bottom surface.
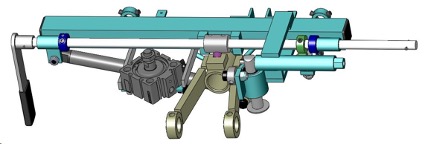
6. Unlock the Mechlok long enough to level the frame assembly so that the pelvic cushion will be aligned with the thoracic area of the table. Orient the centering pin so that it is against the front of the slot on top of the rotation weldment. Tighten both sets of screws. 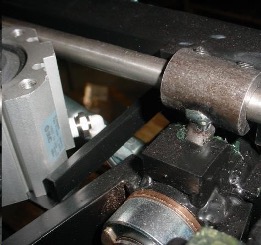
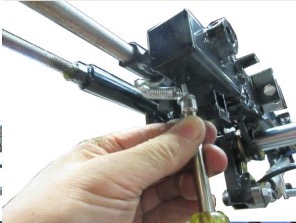
7. Add a little grease to the top surface of the elevator bolt. Thread the elevator bolt up so that the cam can be between the 6 and 7 o’clock orientation when resting on the top surface. Tighten the set screw on the cam.
8. Verify that the assembly is level when the Mechlok is locked, the black handles are pointed straight down, and the centering pin is in the slot with the end of the pin touching the end of the slot. If not, then loosen the centering pin and repeat step 6.
9. Once this orientation has been verified then unlock the Mechlok, lift the black handle to disengage the center pin, test rotating and bringing it back to level position How is the feel of the handle as it is pointed down? Adjust the elevator bolt and cam for proper feel. The more the cam favors 7 o’clock the tighter the cam action will feel.
10. Once the function has been verified the components can be locked in more securely by pivoting the rod where the set screws make contact. Do this by removing one set screw from the plated collar and pivot the rod with a 3/16 drill bit. Re-insert the set screw with blue thread locker on it and tighten. Do the same with the set screw in the other plated collar and then the set screw on the cam.
11. Route the Mechlok release cable over to the 1 1/4″ hole on the bottom of the pelvic cushion. Use the black plastic mount.