Search for answers or browse our help center.
Air Flex Auto Distraction (Tables Built Feb 2010 – Dec 2018)
AirFlex Autodistraction
For tables built Feb 2010 through Dec 2018
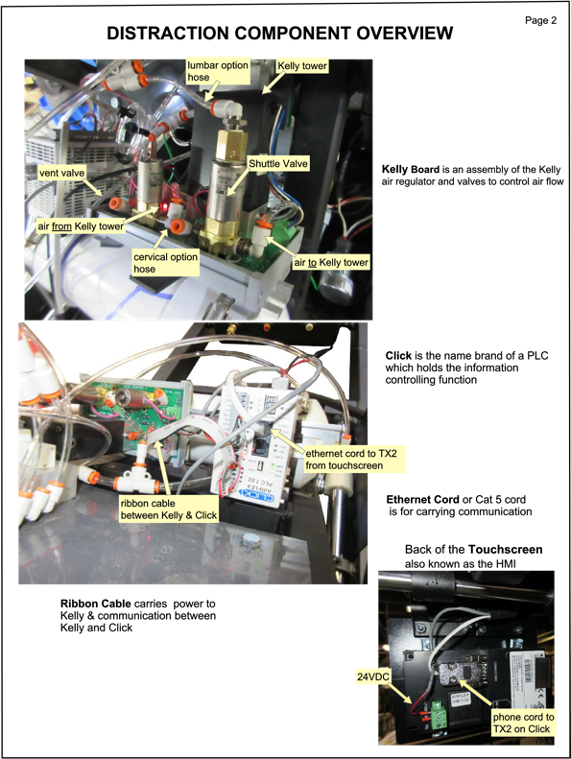
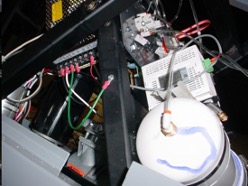
DISTRACTION COMPONENT OVERVIEW page 2
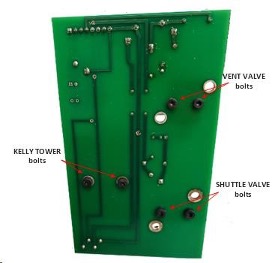
Photo identifying main components of the system
TROUBLESHOOTING page 3,4
A list of symptoms and solutions
KELLY VALVE ASSEMBLY page 5,6,7
How to replace valves on the Kelly Assembly
BY-PASS KELLY ASSEMBLY page 8
Temporarily convert to manual function only
TOUCHSCREEN TROUBLESHOOTING page 9,10
If the touchscreen is blank
Troubleshooting
For autodistract tables built Feb 2010 through Dec 2018
Note that if the table has autoflexion it does not use the Kelly Assem bly to operate the flexion.
Issues:
- The compressor unexpectedly turns on while using or not using the table (runs more often). Main system has a leak.
Solve: The Kelly assembly gets main air, so after testing for leaks in other parts of the main
System and a leak is not found then it would be the black Kelly tower on the Kelly Assembly that has the leak.
Solution: Replace the Kelly Assembly.
- The cushion starts distracting on its own and the force on the screen increases.
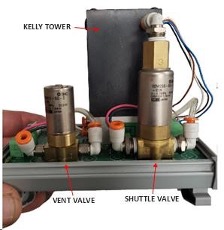
Solve: Air is going through the shuttle valve and right into the distraction cylinder. The Shuttle Valve is the taller silver and gold valve mounted on the Kelly Assembly. It controls the Lumbar and Cervical distraction.
Solution: Replace the Shuttle Valve.
- The cushion does not stay out and the force on the screen decreases.
Solve: Air is coming out of the Vent Valve decreasing pressure in the cylinder
The Vent Valve should only open when the system is taking air out of the cylinder to
make the distraction come back in during treatm ent or at the end of treatment.
Solution: Replace the Vent Valve.
- The cushion does not distract out when treatment is started.
Solve: The Shuttle Valve is not opening to allow air to go to the distraction cylinder.
Solution: Replace the Shuttle Valve.
- If the “Manual” button is selected on the touch screen to manually distract and the cushion goes out but retracts when you stop increasing cylinder pressure.
Solve: The Vent Valve is stuck open and is just venting the air right out that you put in.
Solution: Replace the Vent Valve.
- After the treatment is done and the cushion retracts but the touch screen keeps saying Venting or Reset.
P age 4
- (continued)
Solve: The Kelly Board is not resetting properly, which makes the screen lock into Venting or Reset. The only way to get the screen back to normal would be to unplug the table.
Solution: Replace the Kelly Assembly first, if that does not fix the issue then replace the PLC.
Extra note: If the PLC has to be changed and it does not have 8.0 firm ware then the Touch Screen has to change also.
Return Policy: Order new part from our Parts Departm ent. You must supply a Credit Card for deposit return of the original part. The new part w ill come with a return label. Return the original part within 30 days to avoid a full payment charge.
- If the treatment is running but on the rest cycle it is not coming back in far enough.
Solve: The Vent Valve is not releasing enough air to allow the cushion to com e back in No m atter if the rest is set on 50% or 25% .
Solution: Replace the Vent Valve.
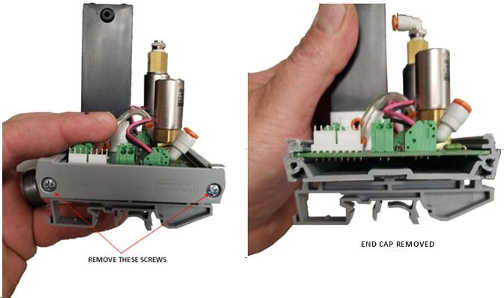
Vent Valve replacement:

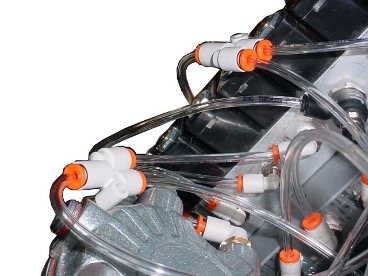
Temporary By-pass of Air Regulator

- Remove the hose from the Y-fitting your fingers to push the orange ring into the fitting while you gently tug on the hose with the other hand.
- Remove the hose at fitting.
- Insert the hose from Step 1 into the fitting.
- Tie (or tape) the Y-fitting from Step 1 to the side of distraction cylinder hose from Step 3 so it does not get damaged by moving parts.
TOUCHSCREEN IS BLANK
Troubleshooting
OBSERVATIONS TO MAKE:
- Power wires at touchscreen.
Use a meter to test for 24VDC where the red and black wires connect. If the screen is blank and there is 24 volts than the touchscreen can be replaced. If there is not 24 volts than verify the other connections.
Use a meter to test for 24VDC at V+ and V- terminals. If you do not have a meter then see if the green LED to the right of the row of terminals is bright green.
The other indicator would be that there are LEDs visible on the Click PLC (white box) and a red LED in the center of the Kelly assembly board. If not 24 volts than replace the power supply. If there is 24 volts then continue to verify the other connections.

3. Connections to source of 24VDC power
Verify that the touchscreen wires are connected to its source of power
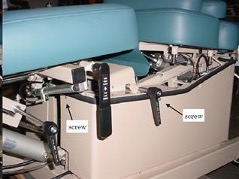
- For tables built from Feb 2010 through Oct 19,2011 make sure a red wire is attached to “24VDC” and a black wire to “GND” on the Kelly board. These supply power to the touchscreen. see Photo 1
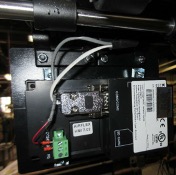
- For tables built from Oct 19, 2011 through Dec2018 make sure there are two red wires is connected to +V and two black wires to -V on the power supply. See photo 2:
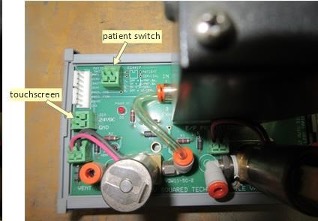 Photo 1
Note: Tables after 10/19/11 do not have wires connected to terminals where it says “touchscreen”. They go directly to the power supply.
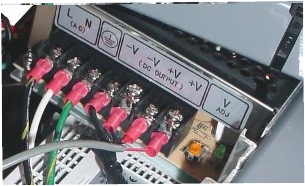 Photo 2
4. Wire Continuity